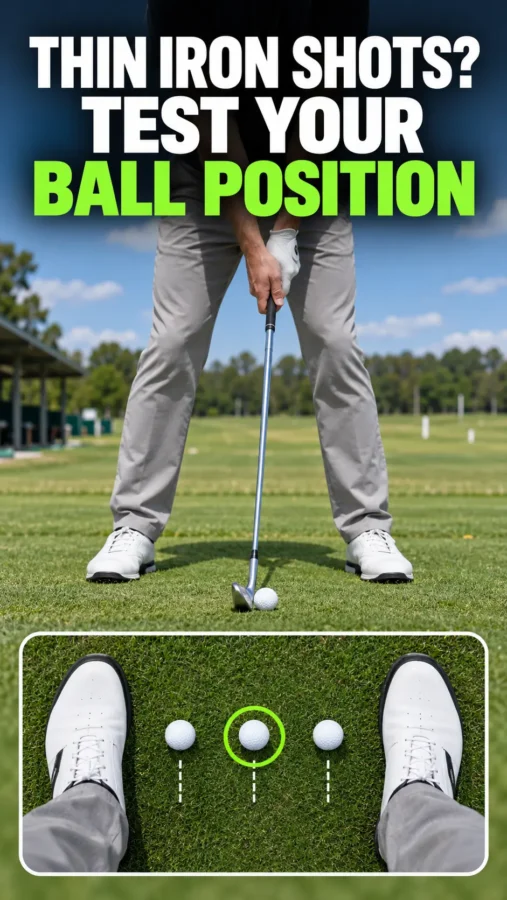

Iron Ball Position: Fix Thin Shots and Push-Slices
When my iron contact starts getting inconsistent, ball position is one of the first things I check.
I learned this through my own experience playing. When I allowed the ball to creep too far forward in my stance, I started seeing several different misses. Some shots were thin. Others were chunked. My most recognizable ball flight started slightly right of the target and then curved farther right into a slice.
Those results could easily convince a golfer that something major is wrong with the swing. But when I moved the ball back, my contact became more solid, the ball started closer to my target line, the flight straightened out, and my distance increased.
That does not mean moving the ball back fixes every iron problem. It means ball position is a variable worth testing before you start rebuilding your swing.
The Ball-Position Mistake That Looked Like a Swing Problem
One frustrating part of incorrect ball position is that it can create more than one bad result.
When I played the ball too far forward, I did not hit the same poor shot every time. I could catch one thin, hit behind the next one, and then send another shot into a push-slice.
That combination makes diagnosing the problem difficult. A thin shot might make you think you stood up. A chunk might make you believe you shifted your weight incorrectly. A slice might send you searching for an entirely different swing-path fix.
Sometimes those swing problems are present. But before changing several parts of your motion, check whether you are asking the club to meet the ball in the wrong place.
If you need a full reference for wedges through driver, read my ball-position guide for every club. For this test, however, we are focusing specifically on your irons.
Why Iron Ball Position Changes Your Contact
Your golf club travels around your body on an arc. During an iron swing, you generally want to contact the ball before the club reaches the lowest point of that arc.
Moving the ball changes where the club meets it during the swing.
If the ball moves too far forward for your particular motion, the club may reach the ground too early, catch the ball thin, or arrive with a face-and-path relationship that sends the shot right. That was the pattern I saw in my own game.
Moving the ball slightly back allowed me to contact it at a better point in my swing. My strike became purer, the ball started on a better line, and the slice was reduced.
Ball position does not control ball flight by itself. Your clubface has the greatest influence on where the ball starts, while the relationship between the face and swing path influences its curve. My guide to face angle and swing path at impact explains that relationship in more detail.
The point of this test is not to declare that one position works for every golfer. It is to identify which position helps you deliver the club most consistently.
Not sure whether setup, contact, or another part of your game needs attention first? Use my free Break 90 Toolkit and Shot Leak Audit to identify what is costing you shots and what to work on next.

The 60-Ball Iron Ball-Position Test
Use this test instead of guessing where the ball should be.
You will hit 20 shots from three different positions:
- Dead center of your stance
- One golf-ball width forward of center
- One golf-ball width back of center
That gives you 60 measured shots.
What You Need
- One mid-iron, preferably a 7-iron
- 60 golf balls
- A flat practice lie
- One clear target
- An alignment stick or golf club placed parallel to your target line
- Your phone or a small notebook for recording results
Hit several warm-up shots before beginning. Do not count the warm-up shots as part of the test.
Keep your stance width, target, grip, posture, and swing intention as consistent as possible. Ball position should be the only variable you intentionally change.
Position 1: Dead Center
Place the ball directly beneath the middle of your chest with your feet set evenly around it.
Hit 20 shots.
After every shot, record:
- Solid, thin, or chunked contact
- Whether the ball started left, near the target, or right
- Whether it curved left, flew relatively straight, or curved right
- Whether the distance appeared normal, short, or longer than expected
Do not change your swing to rescue a certain ball position. Make your normal motion and observe what happens.
Position 2: Slightly Forward
Move the ball forward by approximately one golf-ball width. Keep your feet and alignment consistent.
Hit another 20 shots and record the same information.
Pay attention to whether thin contact or a push-slice becomes more common. That was the pattern I experienced when my ball position moved too far forward.
However, do not assume your results will match mine. Your job is to collect your own pattern.
Position 3: Slightly Back
Move the ball one golf-ball width behind the original center position.
Hit your final 20 shots and continue tracking contact, start line, curve, and distance.
This was the direction that improved my iron shots. Moving the ball back produced purer contact, fewer chunks, a straighter start line, less rightward curve, and more distance.
Your best position might be center, slightly forward, or slightly back. Let the complete group of shots decide.
How to Score Your Results
Create three columns in your notes: center, forward, and back.
For each position, total the following:
- Solid strikes out of 20
- Thin shots
- Chunked shots
- Shots that started near the target
- Shots that flew relatively straight
- Shots that produced your normal distance
Your best ball position is not necessarily the one that produced the single longest or prettiest shot. Look for the position that created the largest group of predictable shots.
For example, one position might produce two perfect shots but also eight thin shots and five slices. Another position might produce 14 solid shots that all finish within a manageable area.
The second group is more useful on the golf course.
What Different Results May Tell You
The Forward Position Produces More Thin Shots and Slices
This resembles what I experienced.
Move your normal iron position slightly back and repeat the test during another practice session. You are looking for improved contact and a tighter pattern, not one lucky shot.
The Center Position Produces the Best Pattern
Use center as your baseline. Mark it during practice and learn what that setup looks and feels like.
Remember that stance width can change your perception. Reference the middle of your body instead of judging ball position entirely from your feet.
The Back Position Produces the Best Contact
Moving the ball back may help your club reach the ball at a better point in your swing.
Confirm the result during another session before permanently changing your setup. You want the improvement to repeat on more than one day.
All Three Positions Produce Similar Problems
Ball position might not be your primary issue.
If you continue striking the ground before the ball from every position, work through these causes of chunked golf shots and poor low-point control.
If contact is acceptable but the ball continues starting and curving right, investigate your clubface and swing path instead of moving the ball farther and farther back.
Don’t Use Ball Position to Chase Every Bad Shot
Ball position should give you a repeatable starting point. It should not become an adjustment you make after every swing.
One poor shot does not prove that your setup was wrong. Even from your best position, you will occasionally make a poor swing.
That is why this test uses 20 shots from each location. A larger sample helps separate a genuine pattern from a random miss.
Avoid changing your grip, alignment, swing path, tempo, and ball position simultaneously. If everything changes, you will not know which adjustment produced the result.
Turn Your Best Position Into a Routine
Once you identify your best position, practice setting up to it without leaving a permanent marker on the ground.
Use this progression:
- Mark your best position and hit 10 shots.
- Remove the marker and set up to five shots on your own.
- Replace the marker and check whether your position drifted.
- Repeat until you can establish the same position naturally.
Add one simple checkpoint to your pre-shot routine. Before swinging, look at the ball relative to the center of your chest and confirm that it matches the position you tested.
This gives you a repeatable setup without filling your mind with another complicated swing thought.
Give the Test a Place in Your Practice
A ball-position test can identify a better setup, but improvement comes from repeating that setup while working on contact, start line, and distance control.
That is why structured practice matters. A drill can expose one problem, but a complete session tells you what to do before and after that drill.
My Foy Golf Academy Practice Plans include 50 structured sessions for each skill level. They combine full-swing work with chipping, putting, and progress checks so you are not standing on the range wondering what to practice next.
Test Before You Rebuild Your Swing
If your iron shots are thin, chunked, or starting right and slicing, do not immediately assume your entire swing needs to change.
Start with the setup.
Hit 20 shots from the middle, 20 slightly forward, and 20 slightly back. Track the contact, starting direction, curve, and distance from every position.
That simple comparison helped me discover that my iron ball position had moved too far forward. Moving it back gave me purer contact, a straighter flight, fewer chunks, and more distance.
Run the same test and let your actual shot pattern—not a guess—show you where the ball belongs.
Ready to turn what you discover into organized practice? Choose the Foy Golf Academy Practice Plan that fits your game and give your next session a clear purpose.