
Perfect Driver Setup: 6 Steps for Longer, Straighter Drives
When golfers hit a bad drive, they usually start changing their swing immediately. They try a different takeaway, force a bigger shoulder turn or manipulate the clubface during the downswing.
But your swing might not be the original problem. Your driver setup could be creating poor contact, low launches, pop-ups, slices and pulls before the club ever starts moving.
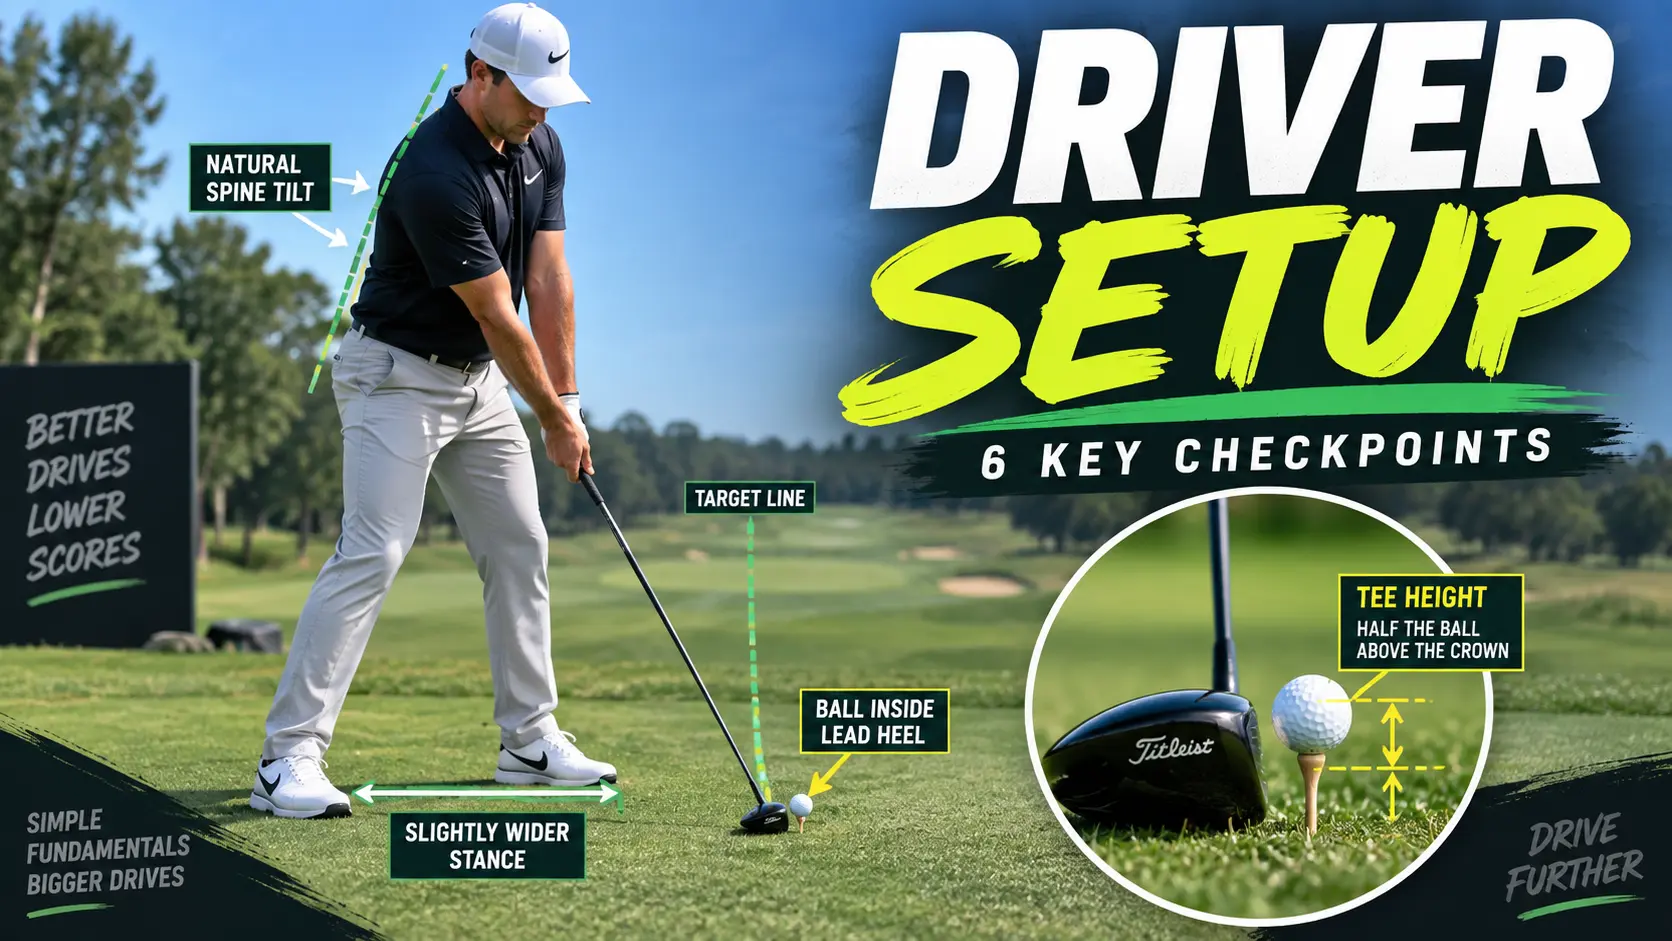
A reliable driver setup gives you enough room to swing freely, positions the ball where the club can reach it properly and helps you create speed without losing your balance. Before rebuilding your swing, work through these six setup checkpoints.
Why the Driver Setup Is Different
The driver is the longest club in your golf bag, and it is normally swung faster than every other club. Unlike an iron shot played from the ground, the golf ball is elevated on a tee.
Those differences require a wider and more athletic setup. You need enough room to swing the longer club, maintain your balance and deliver the driver to the ball without making last-second compensations.
This does not mean your driver swing and iron swing are completely unrelated. The basic motion is still a golf swing, but the ball position, stance width, spine tilt and intended contact conditions are different.
Instead of trying to manipulate the club during the downswing, build an address position that makes solid driver contact easier.
Step 1: Aim the Driver Face First
The first step is aiming the clubface—not positioning your feet.
Many golfers aim their body first. They place their feet where they think they should be and then set the driver behind the ball, frequently leaving the face open or closed to the intended target.
Start by standing behind the ball and selecting a precise target. Don’t simply aim toward the general center of the fairway.
Find an intermediate target on the ground a few feet in front of the ball. This could be a discolored piece of grass, a broken tee, a leaf or another small reference point that sits directly on your intended starting line.
Walk into the shot and place the driver behind the ball. Aim the clubface toward that intermediate target before building the rest of your stance.
Once the face is aimed, position your feet, hips and shoulders around it. This gives you a more repeatable process and prevents your body alignment from unintentionally changing the clubface.
Use this order:
- Stand behind the ball.
- Choose your distant target.
- Find an intermediate target.
- Aim the driver face.
- Build your stance around the clubface.
The golf ball’s starting direction is heavily influenced by the clubface, so check the face before worrying about the rest of your body.
Step 2: Set the Correct Tee Height
With the driver resting naturally on the ground, begin with approximately half of the golf ball sitting above the crown of the driver.
This is a useful starting point, not an unbreakable rule. Your ideal tee height can vary based on your swing, driver design, strike pattern and desired ball flight.
A tee that is too low can encourage contact near the bottom of the clubface. Low-face contact may reduce the quality of the strike and produce a lower, less efficient ball flight.
An excessively high tee can contribute to contact near the top of the face or a pop-up if the club travels too far beneath the ball. You may also become uncomfortable and change your swing simply because the ball looks unusually high.
Test three tee heights during practice:
- One lower than normal
- One with approximately half the ball above the crown
- One slightly higher than normal
Hit several drives from each height and pay attention to the strike location, launch and ball flight. Foot spray or impact stickers can help you see exactly where the ball contacts the face.
Don’t choose a tee height because it looks like someone else’s setup. Choose it based on the results it produces.

Step 3: Position the Ball Inside the Lead Heel
For a standard driver shot, begin with the ball approximately inside your lead heel. For a right-handed golfer, that means inside the left heel.
The driver ball position is farther forward than the position used for most iron shots. This gives the club more time to approach the ball, square and continue moving through the hitting area.
A ball positioned too far back can contribute to low shots, pulls or a clubface that has not returned to square. It may also encourage the upper body to move toward the target at address.
A ball positioned excessively forward can make you reach for the ball, hang backward or lose control of the strike. Instead of moving the ball farther forward whenever you want a higher shot, begin from a consistent reference point.
Place an alignment stick on the ground perpendicular to your target line. Position the stick directly beneath the golf ball and check where it points relative to your lead foot.
This gives you a much clearer reference than looking down and guessing. From your normal address perspective, the ball can appear farther forward or backward than it really is.
Start inside the lead heel and adjust only after observing a consistent pattern across several shots.
Step 4: Build a Stable Driver Stance
Set your feet slightly wider than shoulder width for a standard driver swing. This gives you a stable base while still allowing pressure to move and the body to rotate.
A narrow iron-style stance can make it difficult to remain balanced while swinging a longer club at higher speed. You may sway, lose your footing or struggle to complete the finish.
An excessively wide stance creates a different problem. It can restrict hip rotation, limit pressure movement and leave the lower body feeling stuck.
Wider does not automatically mean more powerful.
Your stance should feel athletic rather than forced. You should be able to turn during the backswing, move through the ball and finish with your chest facing the target.
Slightly flaring the toes can help some golfers rotate more comfortably. This is especially useful if keeping both feet perfectly square makes the hips or knees feel restricted.
Test your stance by making three slow practice swings:
- Make one from a narrow stance.
- Make one from an excessively wide stance.
- Make one with the feet slightly wider than shoulder width.
The correct stance should let you produce speed without falling off balance or feeling trapped.
Step 5: Stand the Correct Distance From the Ball
Because the driver has the longest shaft in your bag, you will naturally stand farther from the ball than you would with an iron.
That does not mean you should reach your arms and shoulders toward the ball. Your arms should feel comfortably extended without becoming rigid.
Create an athletic hip hinge and allow your arms to hang naturally beneath your upper chest. The driver should rest behind the ball without the handle becoming crowded against your legs or pushed excessively far away.
Standing too close can cause the handle to move outward during the downswing. This may contribute to heel contact, an out-to-in path or a loss of posture.
Standing too far away can pull your weight toward your toes and force you to reach for the ball. You may also stand up during the swing to create enough room for the club.
Use a simple waggle test after building your setup. You should be able to move the clubhead freely without:
- Falling toward your toes
- Pulling the handle closer to your body
- Reaching farther toward the ball
- Standing up
- Tensing your arms and shoulders
There is no universal hand-to-thigh measurement that works for every golfer. Body proportions, posture and arm length differ, so prioritize balance and natural extension.
Step 6: Add Natural Spine Tilt and Balanced Pressure
Your trail hand sits lower on the golf club than your lead hand. As a result, your trail shoulder should naturally sit slightly lower than your lead shoulder.
For a right-handed golfer, the right shoulder will sit slightly lower than the left. This creates a small amount of upper-body tilt away from the target.
The tilt should be noticeable without becoming excessive. You are not trying to lean your entire body dramatically behind the golf ball.
Excessive backward tilt can cause you to hang on the trail foot, stop rotating and lose control of the bottom of the swing. Too little tilt can place the upper body toward the target and make the forward ball position difficult to match.
Begin with your pressure approximately balanced or slightly favoring the trail foot. A reasonable starting sensation is close to even, with only a small trail-side bias.
Use an alignment stick or golf club across your shoulders to check the position. Compare three setups:
- Completely level shoulders
- Excessive backward lean
- Small, natural trail-shoulder tilt
The third position should help your upper body match the forward ball position while allowing you to remain athletic and balanced.
Remember that spine tilt is an address position. It is not an instruction to stay on your trail foot throughout the entire swing.
Build Your Driver Setup in the Same Order
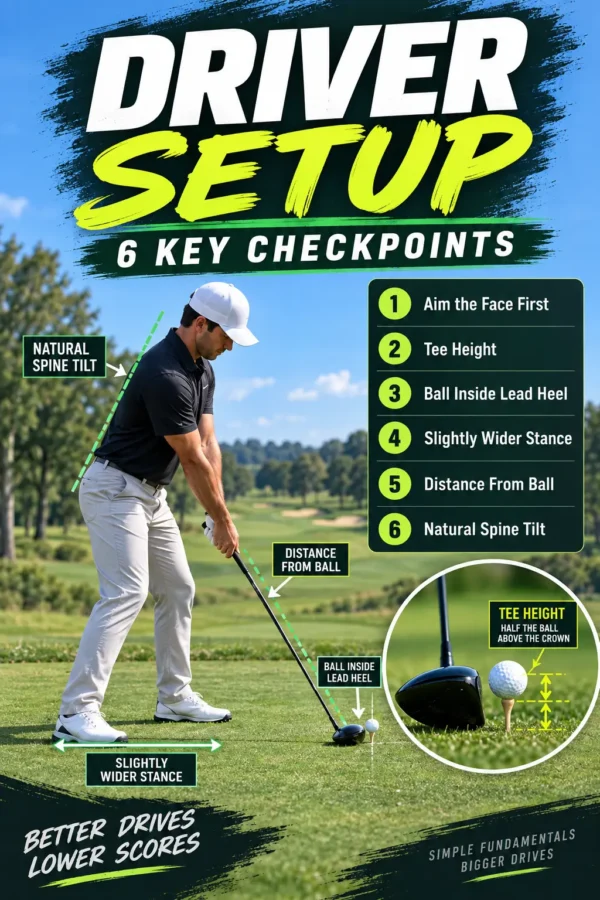
A good setup becomes more reliable when you build it through the same sequence before every drive.
Use this complete routine:
- Stand behind the ball and select your target.
- Find an intermediate aiming point.
- Aim the driver face.
- Confirm your tee height.
- Position the ball inside your lead heel.
- Set your feet slightly wider than shoulder width.
- Establish a comfortable distance from the ball.
- Add natural shoulder tilt.
- Confirm your balance and grip pressure.
- Look at the target and swing.
Avoid standing over the ball while repeatedly adjusting all six setup components. Complete the checklist as you walk into the shot, confirm the finished position and then commit to the swing.
A consistent setup routine removes variables. When a poor shot occurs, you can determine whether the setup changed or whether the problem happened during the swing.
Three Common Driver Setup Combinations
Setup mistakes often appear in combinations rather than individually. Recognizing these patterns can make them easier to diagnose.
The Low Slicer
A golfer who hits low slices may have:
- The ball too far back
- A tee that is too low
- An open clubface
- The upper body leaning toward the target
These conditions can make it difficult to launch the ball while returning the clubface properly.
The Pop-Up Golfer
A golfer who repeatedly hits pop-ups may have:
- An excessively high tee
- The ball too far forward
- Too much backward lean
- A clubhead traveling beneath the ball
Lowering the tee slightly may help, but the entire setup and strike pattern should be checked.
The Heel-Striker
A golfer who regularly finds the heel may be:
- Standing too close to the ball
- Reaching through impact
- Losing balance toward the toes
- Creating insufficient room for the handle
Move through the complete setup checklist before making a major swing change.
These setup combinations are not the only possible causes of each shot. They are simply useful places to begin your diagnosis.
Resource: Grab these 50 practice templates… organized into Driving Range, Chipping, and Putting so you’re not guessing what to work on. Learn more on our home page.
Take the 10-Ball Driver Setup Test
Finish your practice session with a 10-ball test.
Use the full setup checklist before every drive:
- Aim the face.
- Check the tee height.
- Confirm the ball position.
- Build your stance.
- Check your distance from the ball.
- Add natural tilt and balanced pressure.
After every shot, record:
- Center, heel or toe contact
- Starting direction
- Ball-flight height
- Whether the shot finished inside your intended fairway
- Whether you held a balanced finish
Use foot spray or impact stickers to make the strike pattern easier to see.
Your initial success goals are:
- At least 7 out of 10 drives with playable contact
- At least 6 out of 10 inside your intended fairway
- At least 8 out of 10 with a balanced finish
If your results fall below those goals, identify which setup checkpoint changed most frequently. Work on that one checkpoint before adding new swing thoughts.
Fix the Setup Before Rebuilding the Swing
A reliable driver setup begins with the clubface and develops through tee height, ball position, stance width, distance from the ball and natural spine tilt.
You do not need to create a perfect-looking position. You need a repeatable setup that produces solid contact, predictable ball flight and enough balance to swing confidently.
Use the six-step checklist during your next range session:
- Aim the clubface.
- Set your tee height.
- Position the ball inside the lead heel.
- Build a stable stance.
- Find a comfortable distance.
- Add natural tilt and balance.
Once those fundamentals are consistent, you will be in a much better position to evaluate the actual golf swing.
The next lesson in the Foy Golf Academy Driver Series will explain the difference between the driver swing and iron swing—and why trying to hit both clubs with the same setup and impact conditions can create problems.
Golf Practice Plan – What to Do & Not To Do
Wonder why you’re not getting better as fast as you want to be? Here’s your proven system to follow step by step that hundreds of golfers like you are following each month. Our students send us emails frequently praising these practice plans and how much they’ve improved at golf.
Get access to our Practice Plans built for all 3 skill levels (Beginners, Intermediate, and Advanced Golfers).
You’ll learn what to do at the golf course to improve your score and skills and what not to do. Just follow these plans step by step. It’s made easy for you. Plus see our videos, worksheets, and training aid recommendations.
Thanks for reading today’s article!
Nick Foy – Golf Instructor